
Agghhhhh! Earlier this week, mid way through hosting our camp of international folk, the water stopped. On ringing the municipality, we were told that there was a burst water main in Simons Town. Fair enough we think, 2-4 hours and problem solved! Off to the swimming pool we go, buckets in hand and get enough water to flush the toilets (being used by 120 people who are understandably growing increasingly irate) and fill the cisterns. Then we find that the pump that pumps the water from the municipal supply to the tanks at the top of the campsite has broken. luckily we have a spare and David and the guys get to work fitting that. 'Bingo' we say 'problem solved!' but not this time. There is a sensor that is connected to the pump which is meant to kick in when the pressure drops, pumping water to the top tanks and increasing the weight of water pushing from the top, increasing the pressure in the system. It broke. So, we tried the override button, which would technically pump water regardless of the pressure. it stayed on for about 20seconds. Shaun and I said sparewords. Glared at the pump and sat down.
Not to be bested by a lump of components and wire, Shaun picked up a rock, and before I could stop him beating the machine to death, he lent forward...and placed the rock carefully on the override button. Now this was a good plan as far as it went, water would be pumped up to fill the top tanks, bringing back pressure to the system, allowing the kitchen to was h dishes, cook and clean, allowing toilets to be flushed and showers to be had. It was flawless. Apart from one small niggley problem. If we forgot about it, and the tanks filled, the pressure would gradually build and eventually a 20ft high geyser of water would fountain into the air at a random point on the campsite. A fair trade off we decided and went for tea, job done...
Luckily we didn't forget, law and order (and water) was restored to the campsite and I think the camp had a good week. pressure is holding...for now...


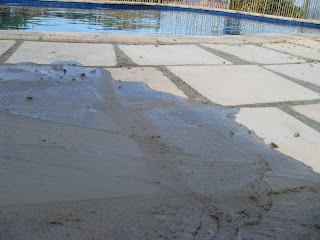
 But with a little patience and a lot of elbow grease, the dry cement layer on top could be removed with a stiff sweeping brush, leaving just the gaps in between the pavers filled. Meanwhile, David got on with building a rather lovely curved retaining wall for the earth next to the chalet, which will either be paved on top or have turf laid.


 Then Shaun climbed in with the angle grinder and straightened off the edge.


 Then, when we were fairly happy with the pattern, we used some nice brown stone chippings to fill the gaps between the pavers.
 So all that's left is to sweep a cement/sand mix over the top of the whole thing, into all the gaps and cracks and then let it get rained on or let the dew work its magic, and knit the whole thing together. Christopher and Nathan helped as well..in their own way...

In Love
13 years ago